Node Package Management

Background

Installing and managing project dependencies with NPM is such a breeze. The Node Package Manager and it’s accompanying tools makes working with dependencies such a trival exercise (arguably more pleasant than MSFT nuget packages and maven POM – later on these).

In a typical application, as a software programmer you will at least once encounter the horric nature of managing external and internal application dependencies, but truth be told, we have moved quiete far from the old urgly days when I first started writing code. Today you literally never have to worry much about such primitive issues using tools such as (not a complete list, but enough to give base and I’ll write about each one of them as time goes by)

  • Package Managers (NMP ,POM, Nuget fall in this category)
  • Inversion of Control (IoC) and Dependency Injection (DI)  (Springboot, Windsor Castle, Autofac, Unity etc)
  • Containarization with docker

However on today’s post, I’m going to be discussing the first category of these tools, specifically NPM, so let’s delve deeper.

Prerequsites

The barrier to entry for this topic is relatively low, there’s only a small finite basics that you need to either posess or attend to at least before going further, but I’ll try to bring you up to speed nonetheless.

Objectives

  • To install a basic npm package and use it within our application.

Key Results

  • Indentifying and discovering packages
  • Downloading and installing packages
  • Applying, embedding and utilizing  packages
  • Running a nodejs application

Guide

I tried to find the most simple but interesting npm package to use for this blog post and I came across a package called chalk which does terminal string styling.

The basics of creating a new node application, begins with creating a package.json file that describes the application metadata (simply information that describes data).

Step 1

using your terminal, navigate into a directory that you’d like to start working on: (On windows this could be your Document directory or even a simpler path like C:\work, if you’re on Unix like system you are probaly very familiar with traversing (simply navigating) directories ).

Step 2

Next create a project directory that will house all our application artifacts (loosely said, this could be anything related to the software, source files, configs etc)

In your terminal, type the below commands, in the order given. The first command will create a directory named “app1” in our current working directory, while the second will navigate into that directory.

mkdir app1 
cd app1

Step 3

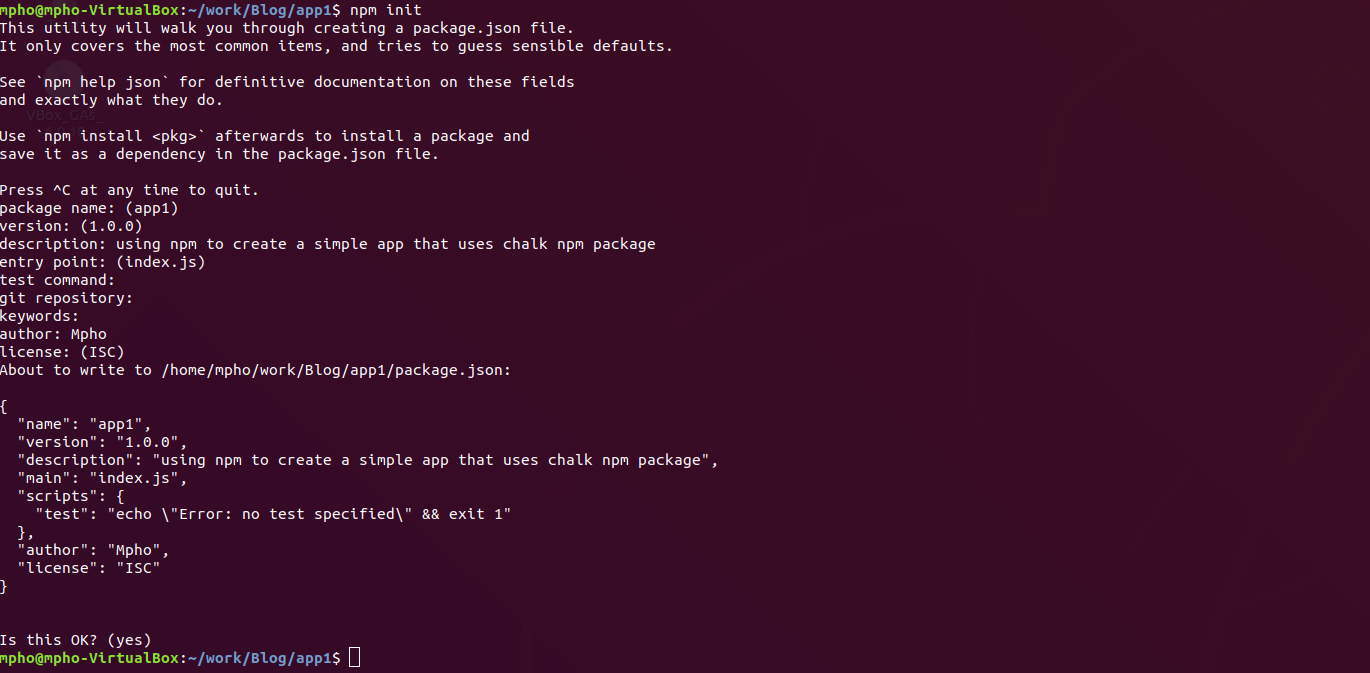
We are going to use npm to create our first artifact (a package.json file) by answering a few basic questions to npm with the command

npm init

Answer the questions, you should have a similar outcome to mine

npm init

Step 4

Now that we have finished initializing our application using:

npm init

We can go ahead and install chalk package from npm using:
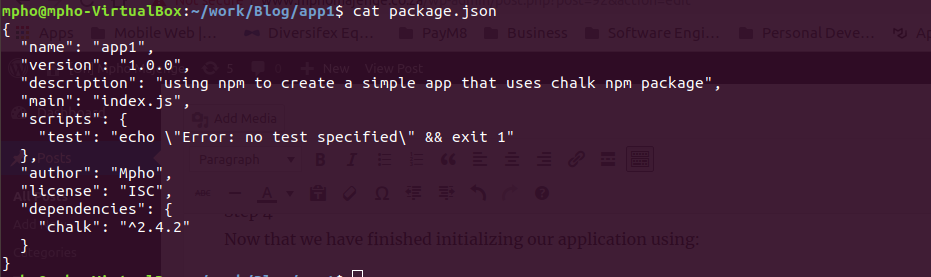
npm install chalk

After installing chalk, a new lock npm lock file called package-lock.json will also be generated in the same directory and the package.json will now be updated with a new element “dependencies”, depicting our recent added dependent “chalk”. The file should now be similar to the screenshot below

Chalk installed

Step 5

Now that we have installed the package, we can go a head and write our simple application to output the words “Hello World” on the console.

Create a new file “index.js” and populate it with this code and save the file.

const chalk = require('chalk');
const log = console.log;
log(chalk.blue.bold("Hello ") + chalk.green("World"));

Step 6

Now you can run your node application, using the command

node index.js

We should have a similar output to the screenshot below

And by that we would have completed this part of the tutorial.

I recommend that you play around with npm a bit more, add other simple node packages and play with them until you are at least more comfortable with this routing work.

Setting up your workstation for Javascript Development

Background

There is a couple of things you will need to setup on your workstation before you can start developing Javascript applications. You may or may not have any of these tools, as always no assumptions are made. Please feel free to skip this if you are a already familar with the concepts discussed here.

Prerequsites

  • Standard working desktop PC or Mac
  • Web browser and functional internet connectivity

Objectives

  • To have a basic Javascript development environment that we can start building applications with and be able to continue building on it as needed.

Key Results

  • Install NodeJS and npm
  • Install and configure Visual Studio Code

Basics first

What is NodeJS?

Computer Science 101 [Not to be intimidated], a runtime environment is defined as

 Most languages have some form of runtime system that provides an environment in which programs run. This environment may address a number of issues including the layout of application memory, how the program accesses variables, mechanisms for passing parameters between procedures, interfacing with the operating system, and otherwise. – Extract from wikipedia

In laymans terms, a runtime environment is a system-level environment (software packages, configuration and sometimes hardware) that is responsible for the execution of application code as per the developer’s intention. A runtime environment is normally very closely related to a given programming language and allows some kind of a standarlized environment across different systems, typically an Operating System for programs or softwares ti execute in, in a predictable manner.

NodeJS is an example of such a system, specifically for programs written in Javascript programming langauge.

What is NPM?

Node Package Manager (NPM) is a packaging management system that works hand in hand with NodeJS for downloading, installation and management of NodeJS based subsystems.

NPM also comes with a handful of cli tools (command line interface) that help in the management of NodeJS based applications and an online package registry (Think an online catelog) that you can use to download other people’s softwares and share yours.

What is Visual Studio Code

Visual Studio Code is a source-code editor by Microsoft that allows syntax highlighting, ondemand code assistance and completion (Intellisense), debugging, source control integration and many more.

Guide

In this post, we are going to be installing the necessary system software required to develop and run Javascript based applications. We are going to  start with the base installation of a Javascript runtime environment called NodeJS that enables your machine to execute Javascript code outside the web browser then Visual Studio Code whcih is a powerful text editor loved by millions of developers.

Step 1

With your browser, open the NodeJS downloads page https://nodejs.org/en/download/ and install an appropriate installer for your OS.

After a successful installation, we should be able to execute the following commands and have a similar output to the screenshot below.

Open your command line interface (CMD / Powershell on windows or Terminal on Unix-like systems) and type or copy and paste these commands on the window presented.

When typing commands, ignore or do not type the $ sign yourself. Depending on your O.S the visual might be different.

$ node --version
$ node --version
Screenshot
NodeJS and NPM test

If your output is similar to mine, then we have successfully completed #1 Key result.

Step 2

To install and start using Visual Studio, open your browser and head on to the downloads section of Visual Studio Code at https://code.visualstudio.com/Download and download the appropriate installer for your Operating System.

After a successful installation of Visual Studio, you should be able to see Visual Studio Code logo among your other system applications (generally the logo will look similar to this).

Visual Studio Code Logo
Visual Studio Code Logo at the time of writing

Openning the application, should give a window similar to this

Visual Studio Code
Visual Studio Code

If you can see Visual Studio Code icon and are able to open it then we have met our second objective.

Fortunately for us, we can keep this post short and simple as Visual Studio comes out of the box with full support for NodeJS and Javascript support. Visual Studio Code itself is written in Javascript using Eletron. 

Nice trick: You can open Visual Studio right from the cli by typing

$ code .

. (dot / fullstop symbol) in this case, presents “Current Directory” and can be replaced with any valid path.